My Patterns
My First Pattern - Lace-It-Up Boot Cuffs
|
I made my first two sets of boot cuffs to give as presents for Christmas (see top image at right). They were created as long rectangles with the short edges joined together by slip stitches to create the cuff. I added a shell stitch along the top and finished with some fringe with butterfly charms on one and beads on the other. The girls loved the cuffs, but the same pattern/size wouldn't work for me and they both wanted to learn how to crochet their own ...
So I developed a pattern for boot cuffs that were adjustable in sizing (see 2nd image at right) and something that beginning crocheters could accomplish as one of their first projects, such as those I'll see at 4-H workshops. The majority of the cuffs are made using double crochet into the spaces as opposed to going into the top of each stitch. It also uses the chain stitch and single crochets if you opt to add a finished edge. You can add any amount of variations to this simple design to make boot cuffs that look quite fancy depending on your level of expertise! See the last section at the bottom of this page for a version with a shell stitch along the top! For the sample, I used the I Love That Yarn Stonewash in teal and a size 6.0 hook. The sample boot cuff used in the pictures for the tutorial was created as a rectangle with 20 rows of double crochet that are 15 stitches wide. You will want to measure your calf circumference and make your cuffs to be about 1" shorter than that measurement. Note: I have used lighter yarn with a smaller hook and adjusted the # of rows to get the size I wanted. See the pictures in the variations section at the bottom of this page. |
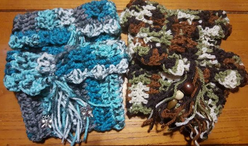
My first boot cuffs - sizing limited to the "stretch" available in the yarn.
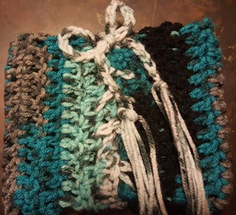
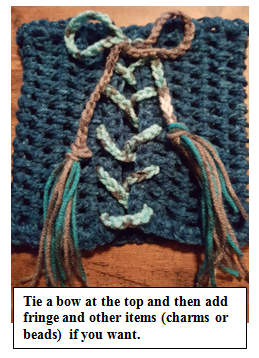
Basic version of the Lace-It-Up cuffs with lacing that allows for the size to be adjusted!
|
Sample Materials
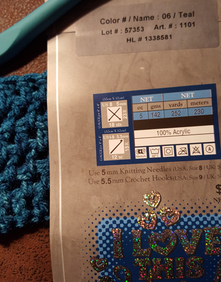
Main Color: I Love This Yarn Stonewash Teal Hook Size - 6.0 mm Lacing Color: I Love This Yarn Agean Stripe Hook Size - 5.0 mm |
|
The Basic Pattern
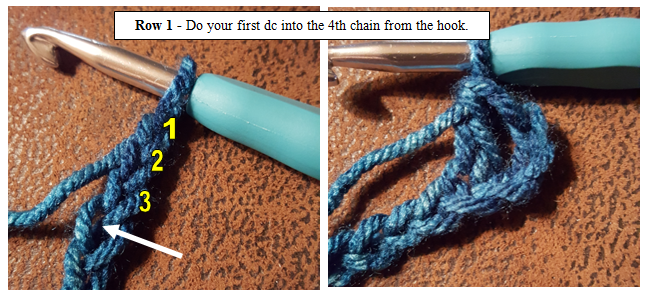
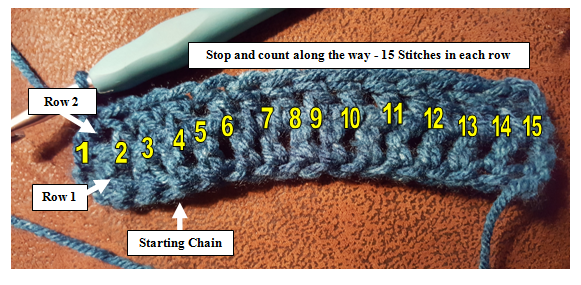
Chain 17 (or add sets of 3 if you want taller boot cuffs) - This will allow you to have 15 stitches in each row, which is what you need for lacing at the end. Stitches Used: ch = Chain stitch, sc = Single crochet, & dc = Double crochet Row 1 Do 1 dc in the fourth chain from the hook (with the 3 chains counting as the first dc.) Continue to do 1 dc in each chain to the end - you should have a total of 15 stitches (or posts) counting the first chain 3 as your first dc. |
|
|
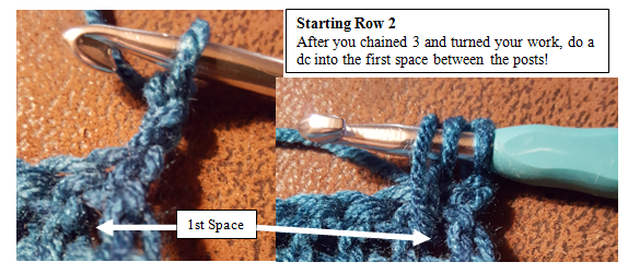
Row 2
Chain 3 (first dc). Do first dc into the space between the turning chain from the previous row and the first dc. Continue to work 1 dc into each space (between the posts) to the end with the last dc in the space between the last dc and turning chain. You should have a total of 15 dc (counting the turning chain at the start of the row. |
|
|
Repeat Row 2 until you have the number of rows needed to get the length you want. It should fit nicely around your calf with about a 1" gap. You may need to do more or less rows if you want longer or shorter cuffs depending on your calf size.
Be sure to stop along the way and count your stitches to keep it at 15 stitches in each row! |
|

|
|
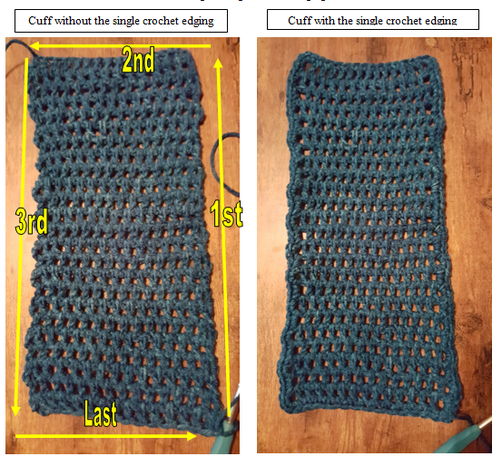
Optional Edging: If you would like a more finished look, do a round (or two) of sc around the entire rectangle.
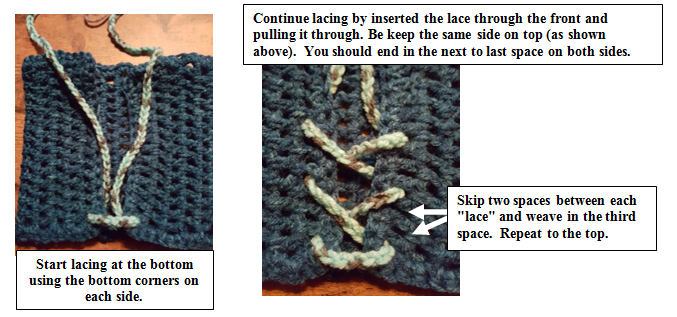
Bottom edge - Begin adding sc stitches to the edge along the bottom side (continuing from where you ended the last row. Do 3 sc in the corner and then do 2 sc in each space made from the dc stitches in each row. For the shorter end, do 4 sc in the corner and then work one sc into each space to the end. Top Edge/Other End - Repeat the same process as you did for the bottom edge (2 sc in each space) Continue around to the other edge by adding 4 sc in the corner and sc in each space. Your last stitch should be the 4th one in the same space where you started. Cut the yarn and tie off the end. Weave in all ends using a yarn needle and trim. Lacing - See images below Need two laces - one for each cuff. I used the I Love This Yarn in Agean Stripe and a 5.0 hook for the sample cuff. Variation - Use ribbon or cording to lace each cuff rather than crocheting a chain. Chain 175 and then tie off the end. Start at the bottom of the cuff and weave one end into the bottom space (between turning chains and 1st dc of the row) by going in through the top and out the underside. Weave the other end into the same space on the other side of the cuff. Continue weaving in the lace up the sides of the cuff in every 3rd space (skip 2 spaces and then weave into the 3rd one). Create a bow to connect the ends. You can also add fringe to the end of each lace - I love my fringe! I've also been know to tie some charms or beads on the ends of a few pieces of fringe on each side to give it a fancier look! |
|
|
|
|
Variations - Shell Stitch
I added a shell stitch along the top since I liked it on the regular cuffs I made for Christmas. Once you complete the round of sc, you can go back along one of the longer edge with shell stitch. I used a combination of 2 dc, 1 tc, 2 dc as a shell stitch for the sample pictured. Start by skipping the end ch, do a sc in the next chain, skip one chain, and then do a shell stitch in the next chain. Skip a chain before repeating the sc, skip 1 ch, shell stitch in next ch, skip 1 pattern to the end. 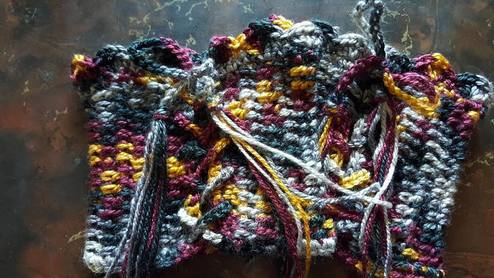
|
Holiday Variations
For the Valentine's Day cuffs (shown below), I added the same shell stitch as mentioned at left, but used a sparkle white yarn. I created hearts using the magic ring as the center and a series of half double crochets, double crochets, and triple crochets to shape the heart. I plan to make a similar pair for Christmas, but use black yarn along with the sparkle white for the edging and use the black to make the laces to resemble Santa's boot! 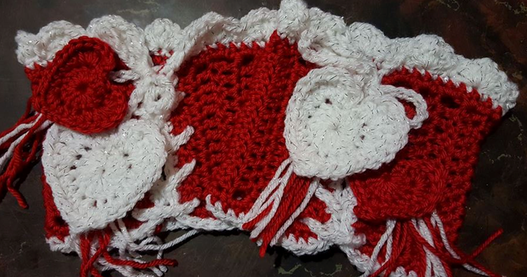
|
Other ideas ... Use safety pins to attach different shapes/designs to the laces, such as shamrocks for St. Patrick's Day, leaves for a fall theme, or snowflakes for winter. This pattern is only limited by your creativity!
Please click my name below to send me a message and tell me how your boot cuffs turned out! Will post my next pattern soon ...
Please click my name below to send me a message and tell me how your boot cuffs turned out! Will post my next pattern soon ...
Tracy Tomm 2017
Please do not claim any of my patterns as your own. You are not allowed to rewrite, sell or distribute any of my patterns and the related images, videos, etc., but are welcome to sell items you personally create with credit given in the form of a link to my website. I welcome visitors to share share a link to my website if they would like to share one of my patterns, but please do not copy the information and post it as your own on a blog, website, or other media format. You may print information from this website for your own personal use or for use when teaching a not-for-profit class or workshop.
Please do not claim any of my patterns as your own. You are not allowed to rewrite, sell or distribute any of my patterns and the related images, videos, etc., but are welcome to sell items you personally create with credit given in the form of a link to my website. I welcome visitors to share share a link to my website if they would like to share one of my patterns, but please do not copy the information and post it as your own on a blog, website, or other media format. You may print information from this website for your own personal use or for use when teaching a not-for-profit class or workshop.
